

When setting up CI/CD for a system, we tend to focus on how our code and database updates will get to our environment. What we often fail to consider, however, is how changes to our environment will be deployed. Fortunately, infrastructure as code is available to us for both AWS (CloudFormation) and Azure (ARM templates). We can leverage infrastructure as code to make our environment changes as we make our code and database changes.
But why?
- Reduced downtime
- Fewer misconfigurations
- Better security
- Easier to create new environments
- Improved team wellbeing
Prerequisites
- Visual Studio Code with Bicep tools (or another editor of your choice)
- Azure CLI
- A basic understanding of GitHub Actions and YAML
Overview
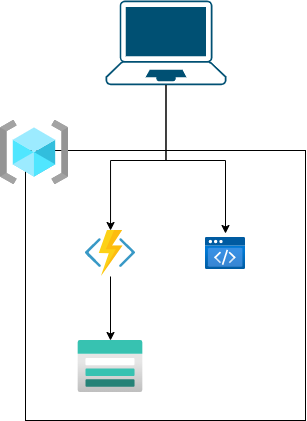
This post will focus on setting up the Azure environment and automatically updating it via GitHub actions and Bicep files. To demonstrate this, we’ll set up a Storage Account, a Function App for the API layer, and a Static Web App for the website. The final structure will look something like
Bicep Files
Bicep is a Domain Specific Language for declaring how to configure an Azure environment. It can create an environment from scratch or update existing resources.
We will have two Bicep files in this example that we will store inside an infrastructure folder for organization. Our primary file is setup-subscription.bicep. The first order of business is to prompt for or take from the command line several variables we need. Some of these, like resourceNamePrefix and location, have a default value and don’t have to be specified but can be overridden. The descriptions are used when prompting the user from the command line for missing variables.
//file: /infrastructure/setup-subscription.bicep
targetScope = 'subscription' //targeting the subscription so that we can create the resource group

@description('Type of environment.  Usually qa, uat, stg, prd, etc.')
param environment string

@description('The azure datacenter location (i.e. westus2).  Can be found with Azure CLI `az account list-locations -o table`.')
param location string = deployment().location

@description('The prefix for all of the resources that will be created.')
param resourceNamePrefix string = 'wif-blog-aaes-'

@description('The prefix for all of the resources that will be created.')
param resourceGroupName string = '${toLower(resourceNamePrefix)}${toLower(environment)}'
The first resource we create is the resource group that will hold all of our other resources. Here the resource group name includes the environment. This lets us quickly establish Azure services for different testing environments and production.
//file: /infrastructure/setup-subscription.bicep
resource resourceGroup 'Microsoft.Resources/resourceGroups@2022-09-01' = {
  name: resourceGroupName
  location: location
}
Next, we will call a module which is a call to an external Bicep file. This is necessary because most of the resources we set up will target the resource group we created instead of the Azure subscription. We’ll look at this other Bicep file just a little later.
//file: /infrastructure/setup-subscription.bicep
module resourceGroupModule 'setup-resource-group.bicep' = {
  scope: resourceGroup
  name: 'setupResourceGroup'
  params: {
    environment: environment
    location: location
    resourceNamePrefix: resourceNamePrefix
  }
}
Finally, we generate some outputs. These will be used in our build pipeline as we deploy the code to these resources,
//file: /infrastructure/setup-subscription.bicep
output resourceGroupName string = resourceGroup.name
output staticWebsiteName string = resourceGroupModule.outputs.staticWebsiteName
output functionAppName string = resourceGroupModule.outputs.functionAppName
output functionAppUrl string = resourceGroupModule.outputs.functionAppUrl
Now the bulk of the work is done in the second file, setup-resource-group.bicep. Again, we will set up several parameters, but we’ll skip the descriptions here because we do not expect this file to be called by a user and only as a module.
//file: /infrastructure/setup-resource-group.bicep
//Resource group is the default and could be omited.
targetScope = 'resourceGroup'

param environment string
param location string = resourceGroup().location
param resourceNamePrefix string = 'wif-blog-aaes-'
param appPlanName string = '${toLower(resourceNamePrefix)}app-plan-${toLower(environment)}'
param functionAppName string = '${toLower(resourceNamePrefix)}api-host-${toLower(environment)}'
param staticWebsiteName string = '${toLower(resourceNamePrefix)}static-website-${toLower(environment)}'
param storageAccountName string = '${replace(toLower(resourceNamePrefix), '-', '')}storage${toLower(environment)}'
Next, we’ll create a storage account. Our Function App will use this account.
//file: /infrastructure/setup-resource-group.bicep
resource storageAccount 'Microsoft.Storage/storageAccounts@2022-09-01' = {
  name: storageAccountName
  location: location
  kind: 'StorageV2'
  sku: {
    name: 'Standard_LRS'
  }
  properties: {
    accessTier: 'Hot'
  }
}
Now we will create a static website. We will be copying our prebuilt website through our GitHub action. Therefore, we don’t want to utilize the static website’s ability to automatically pull changes from a git repository. Thus, this is a straightforward setup.
//file: /infrastructure/setup-resource-group.bicep
resource staticWebsite 'Microsoft.Web/staticSites@2022-09-01' = {
  name: staticWebsiteName
  location: location
  sku: {
    name: 'Free'
  }
  properties: {

  }
}
The last resource we establish in our Bicep file is our Function App. Here we will create an app plan for consumption-based pricing. We will also set up the Function App to run under Linux and as an isolated .NET process. We also set up several environment variables for the Function App.
//file: /infrastructure/setup-resource-group.bicep
resource functionAppServerFarm 'Microsoft.Web/serverfarms@2022-09-01' = {
  name: appPlanName
  location: location
  sku: {
    name: 'Y1'  //consumption based
    tier: 'Dynamic'
  }
}

var storageAccountConnectionString = 'DefaultEndpointsProtocol=https;AccountName=${storageAccount.name};EndpointSuffix=${az.environment().suffixes.storage};AccountKey=${storageAccount.listKeys().keys[0].value}'
resource functionApp 'Microsoft.Web/sites@2022-09-01' = {
  name: functionAppName
  location: location
  kind: 'linux,functionapp'
  identity: {
    type: 'SystemAssigned'
  }
  properties: {
    serverFarmId: functionAppServerFarm.id

    siteConfig: {
      cors: {
        allowedOrigins: ['https://${staticWebsite.properties.defaultHostname}']
      }
      appSettings: [
        {
          name: 'AzureWebJobsStorage'
          value: storageAccountConnectionString
        },{
          name: 'FUNCTIONS_EXTENSION_VERSION'
          value: '~4'
        },{
          name: 'FUNCTIONS_WORKER_RUNTIME'
          value: 'dotnet-isolated'
        },{
          name: 'WEBSITE_CONTENTAZUREFILECONNECTIONSTRING'
          value: storageAccountConnectionString
        },{
          name: 'WEBSITE_RUN_FROM_PACKAGE'
          value: '1'
        },{
          name: 'Quotes__0__id'
          value: '1'
        },{
          name: 'Quotes__0__text'
          value: 'Software undergoes beta testing shortly before it\'s released. Beta is Latin for “still doesn\'t work”.'
        },{
          name: 'Quotes__0__source'
          value: 'Anonymous'
        },{
          name: 'Quotes__1__id'
          value: '2'
        },{
          name: 'Quotes__1__text'
          value: 'Measuring programming progress by lines of code is like measuring aircraft building progress by weight.'
        },{
          name: 'Quotes__1__source'
          value: 'Bill Gates'
        },{
          name: 'Quotes__2__id'
          value: '3'
        },{
          name: 'Quotes__2__text'
          value: 'If debugging is the process of removing software bugs, then programming must be the process of putting them in.'
        },{
          name: 'Quotes__2__source'
          value: 'Edsger Dijkstra'
        }
      ]
    }
  }
}
Lastly, we output a few variables back to the setup-subscription.bicep file.
//file: /infrastructure/setup-resource-group.bicep
output staticWebsiteName string = staticWebsite.name
output functionAppName string = functionApp.name
output functionAppUrl string = 'https://${functionApp.properties.defaultHostName}'
We can now use these files to generate a parameters file. You can use the command, az bicep generate-params --file infrastructure/setup-subscription.bicep or if you are using VS Code with the Bicep extension, you can right-click the Bicep file and select “Generate Parameters File.” I also added a “.qa” to my file name to differentiate the different environments. The result should be something like this.
//file: /infrastructure/setup-subscription.parameters.qa.json
{
  "$schema": "https://schema.management.azure.com/schemas/2015-01-01/deploymentParameters.json#",
  "contentVersion": "1.0.0.0",
  "parameters": {
    "environment": {
      "value": "qa"
    },
    "dbServerName": {
      "value": "tempserver"
    },
    "dbInstanceName": {
      "value": "tempinstance"
    }
  }
}
Now we can test our Azure environment with the command
az deployment sub create --location {your location} --template-file infrastructure/setup-subscription.bicep --parameters infrastructure/setup-subscription.parameters.qa.json
GitHub Actions
It is time to create our GitHub Action deployment as part of our normal CI/CD process. We won’t go over the entire process but just those portions that are important to our CI/CD pipeline.
To start, we will need to get some credentials from Azure so that GitHub can connect. Since we are creating the resource group, this permission must be scoped to the subscription. This will generate JSON data necessary for our Azure login. Ideally, this would also be restricted to only the permissions our deployment needs.
az ad sp create-for-rbac --role contributor --sdk-auth --name "github-action-deploy" --scopes /subscriptions/{your subscription id}
You should create the following secrets inside your GitHub repository.
| Key | Value |
|---|---|
| AZURE_CREDENTIALS | The JSON from the command above |
| AZURE_SUBSCRIPTION | You azure subscription id |
The first steps we want to highlight are the actual deployment of our Azure environment via our Bicep file. Here we first log into Azure and then execute our Bicep file template. The deployment name, wif-blog-aaes-${{inputs.environment}}-${{ github.run_number }}, utilizes the GitHub run number to track our different deployments in Azure.
#file: /.github/workflows/deploy-app.yml
      - name: azure-login
        uses: azure/login@v1
        with:
          creds: ${{ secrets.AZURE_CREDENTIALS }}

      - uses: azure/arm-deploy@v1
        id: azure-environment-setup
        name: azure-environment-setup
        with:
          scope: subscription
          deploymentName: ${{ env.DEPLOYMENT_NAME }}
          region: eastus2
          subscriptionId: ${{ secrets.AZURE_SUBSCRIPTION }}
          template: ./infrastructure/setup-subscription.bicep
          parameters: ./infrastructure/setup-subscription.parameters.${{ inputs.environment }}.json
          failOnStdErr: false
Another step to highlight is the deployment of the static web app. We utilize the output from azure-environment-setup to get the static web app key through an Azure CLI command. Then we can use that key to push our precompiled frontend to the static web app.
#file: /.github/workflows/deploy-app.yml
      - id: get-api-key
        name: get-api-key
        uses: azure/cli@v1
        with:
          inlineScript: |
            key=$(az staticwebapp secrets list --resource-group ${{ steps.azure-environment-setup.outputs.resourceGroupName }} --name ${{ steps.azure-environment-setup.outputs.staticWebsiteName }} --query "properties.apiKey" | tr -d '"')
            echo "::add-mask::$key"
            echo key=$key >> $GITHUB_OUTPUT

      - uses: Azure/static-web-apps-deploy@v1
        name: deploy-static-site
        with:
          skip_app_build: true
          azure_static_web_apps_api_token: ${{ steps.get-api-key.outputs.key }}
          repo_token: ${{ secrets.GITHUB_TOKEN }}
          action: "upload"
          app_location: "src/ui/build"
          output_location: ""
We can now automatically create an Azure environment and deploy our code with these files. Standing up a new environment is as simple as creating a new Bicep config file and the appropriate GitHub Action triggers. If the Bicep files are updated, the changes are updated in Azure when triggered in the GitHub Action. Now, you can update your environment as part of your normal CI/CD process.
The entire repo with complete files and application can be found here.
Digging Deeper
Here are some additional resources if you’d like to learn more.